Home | Looking for something? Sign In | New here? Sign Up | Log out
Showing posts with label Nokia Mobile. Show all posts

Saturday, September 1, 2012

Nokia C1 display light problem

Fault description:
Nokia model C1 sometime had a strange problem that we can’t see display back light on LCD. This problem occurs due to problem in LCD or sometime in LCD IC and track missing from display transistor to LCD connector. 

Fault solution:

For quick solution of this problem we have to use following methods:
1.       First try to restore mobile factory setting using code *#7780# then mobile will
Restore in its factory value because sometime due to some setting mismatch we got this error.
2.       Secondly we have to use hardware methods so use next step.
3.       Open mobile and apply new lcd to mobile and check for solution 
4.       If no solution then we have to use jumper from lcd track first to a point on back side of pcb because that first connector receive current from that point and due to some internal crack in track print line miss there so apply following jumper there.  
                                                                 This is LCD connector side


And this is PCB back side


These methods will solve our problem and we will get our solution.

Conclusion:
During jumper setting process we should take care that jumper wire should not touch any component or not grounded.

Nokia N8 camera problem

Fault description:
Nokia n8 is latest mobile but some time mobile camera starts stop working. So we can’t capture image and record video. When we open camera it will shows camera failure or hardware failure restart camera message.  This problem appears due to sometime software reason or some time hardware problem. So here we consider both methods one by one.

Fault solution:
For this problem solution we have to use following methods:
1.       First we apply software methods
2.       Open camera and press option an open camera setting then press restores camera setting then mobile camera setting will restore to its factory condition then check camera. 
3.       If no luck then open mobile and first we should change camera switch and check for solution.
4.       After changing camera switch check line from all camera point to camera resistance as following  image:


5.       First connect point 1 and 2 as shown in image and then apply jumper from first point to camera resistance as shown with blue mark.
6.        Then connect point 3 and 4 together and apply jumper from point 3 to other resistance as shown in image with red mark.
7.       Finally connect point 5 and 6 and make them ground as shown with black mark in image.
8.       After these entire three jumpers camera will work defiantly.
  
Conclusion:
First we should check all basic settings because if we apply jumper first without setting testing then this may result in wrong output.

Nokia X6 handsfree problem

Fault description:
Nokia X6 sometime have handsfree problem. So we can’t use earphone and sometime mobile shows handsfree logo on screen permanently. We got this error due to some setting mismatch and sometime due to hardware problems.

Fault solution:
For solving this problem we have to first check setting for quick solution. So apply these steps:
1.      Go to setting and select profile management there selects normal profile and check result
2.      Then got to setting of enhancement in enhancement mode select headset mode.
3.      Now first open mobile and change handsfree jack and check problem
4.      If problem still remains after changing handsfree jack then we have to use jumper for sound IC.
5.      First remove sound ic Z2010 as shown in image below carefully


6.       After removing IC we have to make jumper on all IC point as shown in image with blue mark.
7.       Middle point should be blank with no connection.
8.       After applying these jumpers we will solve our problem defiantly.
Conclusion:
 During IC removing process heat and air setting in heat gun should be in proper setting otherwise IC’s internal print will be damage.

Nokia X6 camera hang problem

Fault description:
Nokia X6 mobile some time got very strange problem that when we on camera then mobile just hangs and camera also don’t work. So we can’t capture image and record video and mobile also hangs when we open camera. When we open camera it will shows camera failure or hardware failure restart camera message.  This problem appears due to sometime software reason or some time hardware problem. So here we consider both methods one by one.

Fault solution:
For this problem solution we have to use following methods:
1.       First we apply software methods and we should flash mobile with latest version.
2.       Open camera and press option an open camera setting then press restores camera setting then mobile camera setting will restore to its factory condition then check camera.
3.       If no luck then open mobile and first we should change camera switch and check for solution because sometime camera switch got internal shorting and due to that we got this error.
4.       After changing switch if no solution yet then we have to use jumper setting as described below.


5.       According to image we have to remove three camera transistor and IC as N1402, N1403, and N1404 carefully.
6.       We have to remove these ICs because these ICs got internal problem in their circuit so due to that we got this type of error.
7.       After removing all those we should first jumper from a point on PCB to resistance as shown with blue mark line in above image.
8.       Secondly connect two other resistance with red line as shown in image
9.       Last connect a jumper between two more resistances as shown in image with blue color mark line.
10.   After successful applying these entire jumpers now check camera and mobile for problem   our problem will solve definitely. 

Conclusion:
During all these IC removing process we should properly remove ic because in any nearer component are shorted then we will get more problem so be careful.

Tuesday, July 31, 2012

How to solve not working contact service fault in nokia 7210c

Fault description:

Nokia 7210 has contact service fault due to bad pm file, in some cases pm file corrupted in mobile so we get this error that when we power on mobile then it just shows contact service message in red letters on screen and then power off after few seconds.  

Fault solution:
1.      First we should flash mobile with latest version. we can flash mobile using any flash tool like mx key or ufs or jaf box or mt box
2. Now check weather problem solve or not if no then apply next step.
3.We have to write full pm file (permanent memory) in mobile. All pm file can be downloaded from support site of our flasher box. For write pm file using mx key we have to follow following steps:-
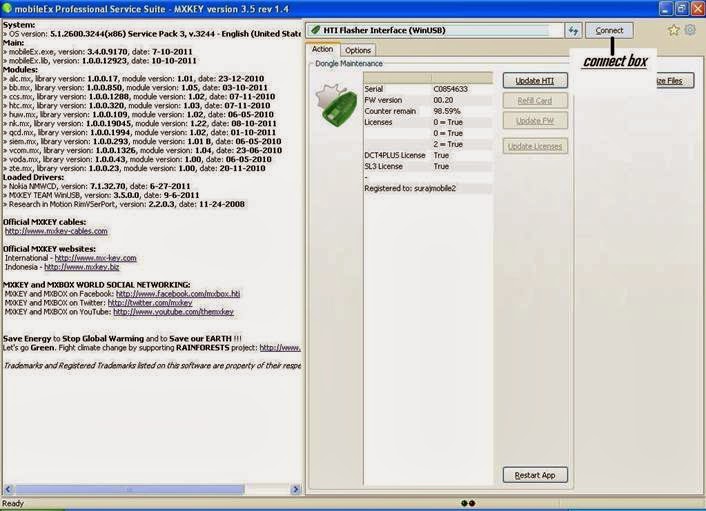
 A.      First connect mx box to computer


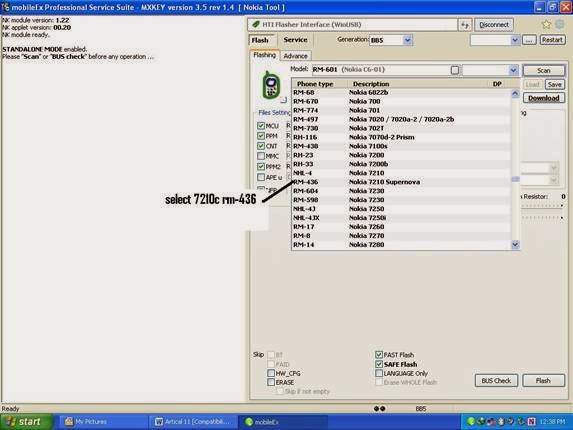
B.      Then select appropriate mobile brand here we should select nokia service tool


C.      Then select appropriate model here we select nokia 7210c rm-436

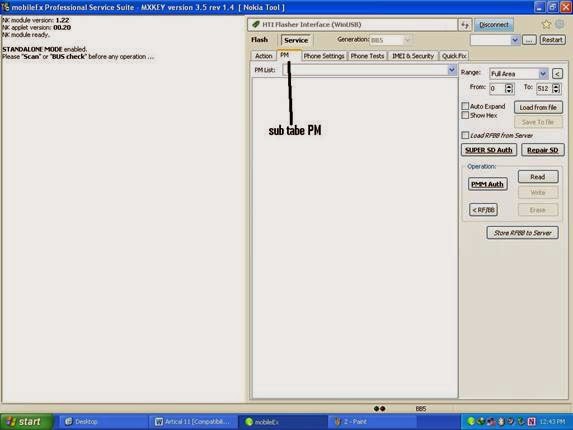
D.      Then go to service  tab


E.      In service tab open sub tabe PM


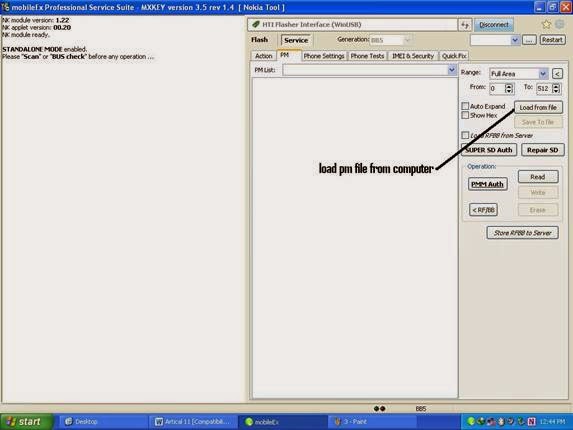
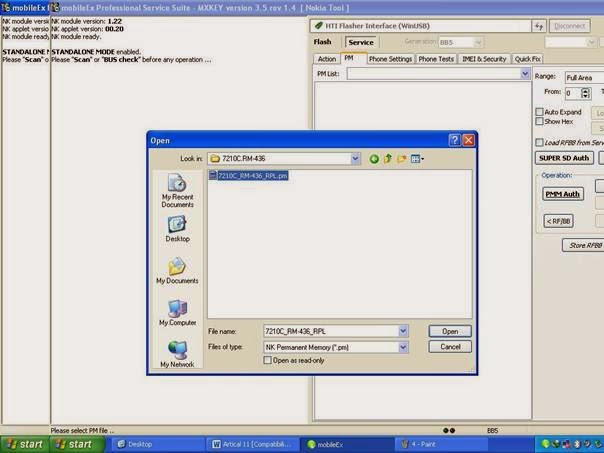
F.        Now press load from file here we have to open PM file from our computer location where we had stored it.


G.      Here we select 7210c pm file.


H.      Now write full pm file of all section.


Now contact service problem will solve.
If still we get the error then we have to buy new rpl file from server.
 Conclusion:
PM (permanent memory) file is most risky file in mobile phone because it stores all important data of mobile so during writing pm file we should take care that file should be same as mobile model no. otherwise we will get further many error.

Thursday, February 23, 2012

Fix no network problem in nokia 5800 using flasher box


Introduction:

In some cases when network just appear for 5 second and then no network ,in such type of situation we have to use flasher box for repair that problem . There are many flasher box available in market for nokia mobile like hwk,mx-key,universalbox,mt box etc..


Description: 

Network fault in nokia mobile sometime can be caused by software error.
There are two main reasons that cause network problem that are shown below:
A.      Setting mismatch
B.      PM (permanent memory) file error

A. Setting mismatch :
There are some networks setting in mobile due to these mismatching we get network error. 

Solution:
We can access these setting in setting – network setting - Network type –
If you are using 3g sim then select dual mode or 3g mode else select gsm mode

B. PM file error :
Pm (permanent memory) file is permanent file that is stored in mobile it contains mobile product data like product code, life timer and purchasing date, repairing date etc. if this file got any error then mobile have network problem that it just appears for few second then no network.

Solution:
Connect mobile to any nokia flasher box via fbus cable.  Here we use hwk box as example
1.      Connect box - first connect box to pc
2.      Select brand -  Then select appropriate mobile brand like DCT3,DCT4,WD2,BB5
3.      Then select correct model from list here we take nokia 5800 as example.
4.      Then write Appropriate PM file of that mobile.

Screenshots:

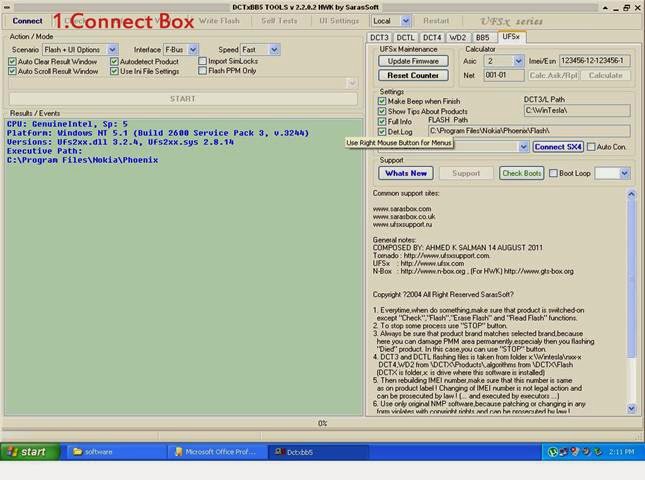
1.    Connect box: first connect box to computer and attach mobile.

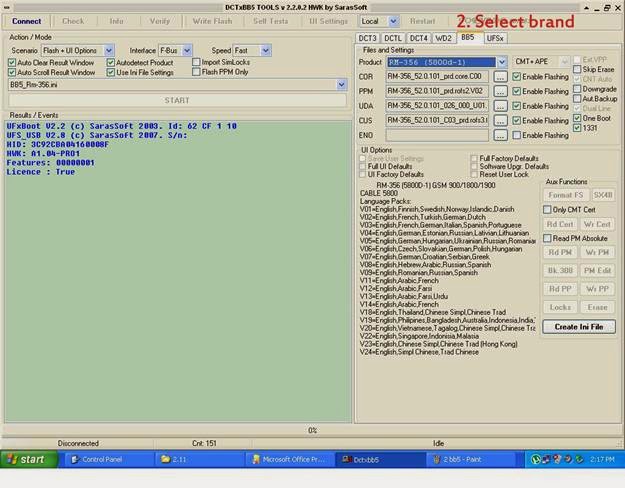
2.    Select brand: we have to select brand here we select BB5 from brand tab. 

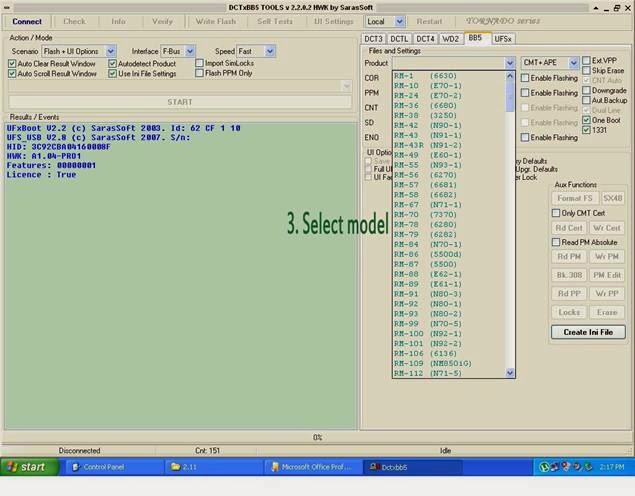
3.    Select model: select model from model list as shown below

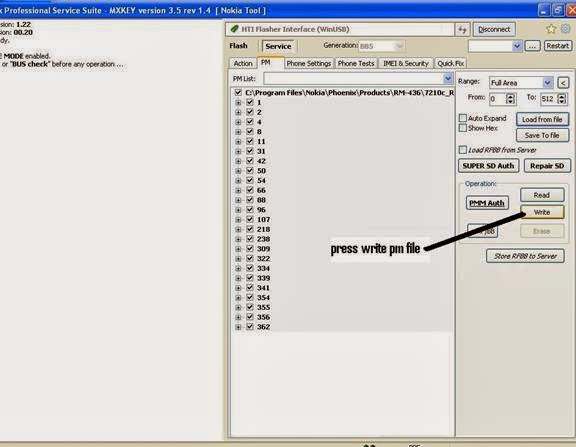
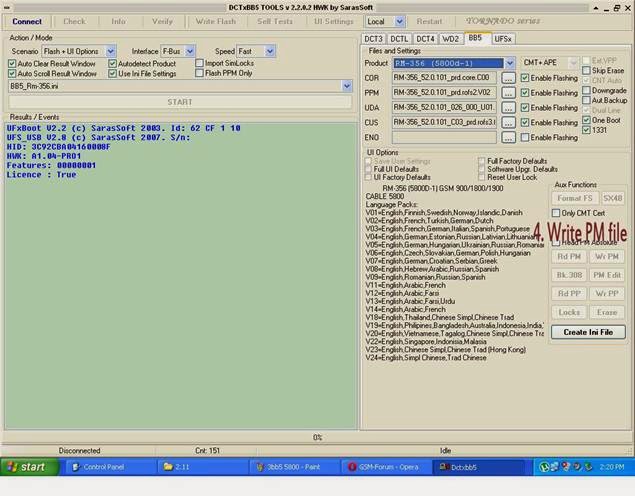
4.    Write PM file: after selecting model press write pm file it will write pm file to mobile.  


Conclusion  :
In network fault repairing(using software method) we have to consider only one file PM file carefully because if we write wrong file then we can damage our mobile permanently so be careful when writing PM file .    
 

Thursday, January 12, 2012

Nokia C2-02 mobile power button problem

Fault description:
Nokia C2-02 mobile some time doesn’t power on with power button. Due to this we can’t use mobile. But in this case we can charge mobile and when we plug charger into mobile then we will see charging indication on screen so this is power button fault mean power button is not working

Fault solution:
For solving this problem we have to follow these steps carefully:
1.      First we should flash mobile with latest version and check problem
2.      If no solution yet then open mobile and clean pcb and keypad flex completely
3.      After this step we have to apply jumper setting as following image.


4.      First  connect a jumper from power key point to a resistance as shown in image
5.      Then from that resistance connect another jumper to a point connection on pcb as shown with yellow mark
6.      After connecting these two jumper power key will work perfectly and we can power on mobile.  

Conclusion:
Due to power switch problem mobile doesn’t power on but in some cases it can be caused by corrupted software so first we should flash mobile and then apply hardware jumper.

Nokia 3110 vibrator not working

Fault description:
In nokia 3110 mobile sometime we have no vibration problem. This problem appears due to problem in vibration motor or sometime problem in vibrator internal circuit.

Fault solution:
For quick solution for this problem we have to follow all these steps one by one:
1.      First check mobile profile setting and check that vibration is on there then check problem
2.      If no solution then we have to change new vibration motor and then check for solution
3.      If still no luck then there is some problem internal circuitry of vibrator so we have to follow these jumper setting as in image below;


4.      First we should apply a jumper from a resistance shown in image with red mark to vibrators first point
5.      Then apply other jumper from other resistance as shown with yellow mark to vibrators second point as shown in image above.
6.      After applying both jumpers now check vibration now vibration will work without any problem. 

Conclusion:
First we should check all basic setting for vibration problem because sometime due to setting problem this error occurs and we waist our time in applying jumper.

Samsung S5230 touch screen (pad) problem

Fault description:
In Samsung S5230 mobile sometime have touch screen problem that touch screen doesn’t work properly or sometime doesn’t work completely. This problem occurs sometime due to setting mismatch or some time due to hardware reasons. Here we consider both

Fault solution:
For solving this problem we should first check software methods as following tips:
1.      First open setting and in setting press screen celebrate then mobile will ask for touching on special dots on screen one by one then complete full celebration and then check problem
2.      If no solution then reset mobile to its factory setting
3.      If still no solution then we have to change new touch pad so change touch pad and check for solution
4.      In some case after changing touch pad mobile remains in same condition because of some internal shorting in few resistance  so we have to follow next


5.      So according to above image we have to first  remove first resistance as shown with blue line and check for solution
6.      If no solution then remove all four resistance one by one as numbering carefully.
7.      After removing all these resistance our touch pad will work fine without any problem. 

Conclusion:
In some case we have to also change new touch even after removing of all these resistance because sometime both touch pad and resistance got problem at same time.

Wednesday, December 29, 2010

Nokia N70 not charging and no response error

Introduction:

Nokia N70 has a common fault that is charging error. There are two types of charging problem that described below.

1. Not charging
2. Charging no response

1. Not charging :

Fault description: Some time due to bad charger or high voltage from supply mobile got this error that when we insert charger it shows “not charging” message on screen

Solution:

A. First check that we are using proper battery BL5C for nokia n70

Here is image of BL5C battery:-


If we use Wrong battery like BL5CA then we got this error.
Below here is image of BL5CA battery:-


B. There is a track above data cable connector that is used to flow current through it, so cut the track shown in red line properly with appropriate equipment.

Here we show that track with image so how to cut:-


C. If above solution not work then finally first rehot the charging crystal shown in red marked and then change the crystal. That charging crystal is

Shown below:-


2. Charging no response :

Fault description:

In this fault mobile show charging ok but mobile does not store charge and it discharge immediately after few minutes.

Solution:


In this problem charging pin does not deliver appropriate current to charging resistance so Apply jumper from one charging connector point to charging resistance Shown in image below :-


Conclusion: If we properly follow all above tricks step by step then we can solve our charging based problem quickly.

Monday, December 27, 2010

Network Fault in mobile (n91 and 6131), no network solution

Network fault is a major fault in nokia mobile. This can be due to two major reasons:
  • A. Hardware problem (like physical damages and water damage)
  • B. Software problem
First we consider hardware problem in nokia mobile below.
Types of fault:

1. No network in mobile:
Description:
In some case mobile have no network when we manually search or set automatically mode.
This fault mainly due to hardware problem (in 75% cases) & in rest of cases this fault due to software error.

Solution:
1. First manually search network if any operator found but failed to register then check network antenna switch then use following tips:
  • A. Firstly heat over antenna switch section
  • B. Then apply antenna jumper same as in below image :-
Jumper :- Jumper is a bypass technique to work like antenna switch .jumper connect two or three point of antenna switch .

  • C.If problem persists then replace the network antenna switch.
2. In case when we manually search the network and no network found then check 

“PFO (power frequency oscillator)” sometime called PA.
Below is image of nokia 6131 pfo (pa)


  • A. First clean the pfo with acetone or white petrol then heat over pfo section
  • B. If problem persists then reball the pfo
  • C. If problem still persists then change the pfo.


Conclusion:


To repair network problem due to hardware reason we have to consider just two main component pfo and antenna switch to repair properly network problem. For this you should follow all instruction step by step. If we properly make right diagnosis and follow all instruction then our network problem will be 100 % solved.

Popular Posts

Advertisement

Compare hotel prices and find the best deal - HotelsCombined.com